
Introduction
Dockerize may sound like a fancy term at first- but it is not anything to be intimidated by. In simple terms, Dockerize is utility that can help in simplify the running apps in Docker containers. This can be achieved by making use of container environment variables and templates.
Docker and the container are already being flaunted as a revolution, because managing applications in Docker is far easier than managing the applications in legacy way.
As the industry is heading towards Docker adoption, the real challenges are discovered on how to monitor the infrastructure / applications where Docker containers are running.
In this Blog we will explain How to collate the logs from various Dockerized applications and how to monitor the application logs through ELK (Elasticsearch, Logstash, Kibana) stack along with Filebeat and Dockbeat by using below scenarios.
- Application monitoring
Monitoring of Application level logs like Error logs, Info logs, Login Failures, Capturing Geo location, etc.
- Infrastructure monitoring
Monitoring of Infrastructure information like Host metrics – such as CPU utilization, Memory utilization, Disk utilization etc.
Deployment Model
The high level Deployment model is as depicted in the below deployment architecture:

The following points provide high level description of the Deployment model. However, a step by step procedure is provided from the next sections of this Blog.
- Launch Two EC2 Instances on the AWS cloud
- Install Docker Engine in the first EC2 instance and run the application with Filebeat.
- Install ELK stack in the second EC2 instance for monitoring containers.
- Install Docker Engine in the first EC2 instance create two Docker containers and deploy different java applications along with Filebeat.
- Configure the Filebeat.yml file for collecting logs from the application and configure it to connect Logstash.
- Configure the Dockbeat.yml file for connecting to Elasticsearch.
- Run the Java applications through a web browser.
- In the second EC2 instance install ELK Stack, then configure the elasticsearch.yml and kibana.yml file to communicate each other.
- Write a required logstash.conf file for getting the required information related to our containers.
- Finally, monitor the applications by using Kibana
Docker Setup Introduction
Deploying and running any web application like Java or PHP will have it’s own dependencies / pre-requisites like run-time environment, the compatible jar files etc.
On a day to day basis we come across many situations where the application is running properly on the Dev / Test environment and the same application is deployed / ported to a different environment like Staging / Production, the application fails to deploy successfully. In most of the cases, the reason would be either version mismatch, OS compatibility, required deployment files are missing and so on and so forth.
To overcome this kind of situation Docker engine offers a containerization platform to eliminate the above mentioned hurdles and to have a seamless portability and application deployment. Docker supports packaging of application along with Operating System, runtime environment, application related software into standardized containers that include everything that are needed to run the application.

Step 1 - Docker Setup & Configuration:
Pre-requisite is that you should be familiar with AWS cloud and should have an account with AWS (Amazon Web Services) account-
- Login into AWS (Amazon Web Services) Account :- https://signin.AWS.amazon.com/
- Create Two Ubuntu EC2 instances, and set required firewall rules to control the traffic of instance.
- Connect instance using Public DNS. It is better to set Admin privileges by using “sudo su” by permanently
-
- Install docker engine on first EC2 instance
Deploying Application on Container
Get a plain tomcat Docker image from Docker hub by Creating a Docker file (name must be dockerfile) and edit the dockerfile with the mentioned command. $ vi dockerfile Add the below mentioned line to the docker file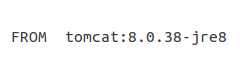
-
- Build the image and tag as “tomcat:latest” or any name.
-
- Build and run the docker container from the docker image “tomcat:latest”

-
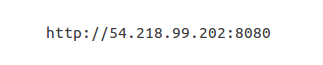
- Access the tomcat from browser “Instance_public_ip:port”
-
- Copy the web application from the local system to AWS EC2 Instance, in case f application is available in local system. Open new CLI and type following command.

-
- Move / copy the application file to Docker container.

-
- Use the following command to access the Docker Container for make any configuration changes.

Docker Hub Registration:-
Docker Hub is a Repository to store Docker images. Docker Hub provides an option to store Docker images as private and public.- Create Docker account with valid credentials
- Login to Docker hub https://hub.docker.com/login/
- Create new repository and push the own docker image to the repository from EC2 instance.
Step 2 - Filebeat Installation & Configuration:
Filebeat is a log data collector and shipper. For monitoring containerized application install Filebeat on Docker container. Open https://www.elastic.co/products/beats/filebeat find the latest filebeat and choose .deb file Right click on it choose “copy link address”, and paste it on terminal $ wget https://artifacts.elastic.co/downloads/beats/filebeat/filebeat-5.1.1-amd64.deb-
- Install using the following command
-
- Edit the filebeat.yml and do some configuration modifications which is required
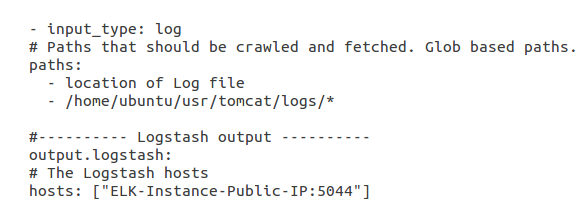
-
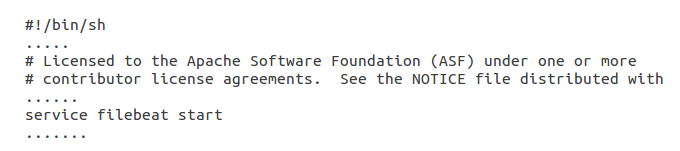
- To start Filebeat automatically when container starts add “service filebeat start” command in tomcat “catalina.sh”
-
- Exit from the Docker Container and commit the changes and build new image

-
- For pushing the Docker image to Docker Hub repository. Login to Docker Account with secured credentials by following command.
-
- Push the updated docker image to docker hub

-
- Now access the application through browser
Step 3 - Dockbeat Installation & Configuration:
Dockbeat is used for monitoring Docker daemon. It is a lightweight agent that needs to be installed on EC2 instance where the Docker engine installed. Periodically it reads Docker container statistics and indexes them in Elasticsearch.-
- Download Dockbeat from git hub and paste it on terminal and unzip that.
-
- Download executable file from following link using terminal
-
- Give execution permissions to above downloaded file.
-
- Edit dockbeat.yml and configure elasticsearch destination ip address and port number.

-
- Run the dockbeat
-
- Troubleshooting:
Step 4 - ELK Installation & Configuration:
For detailed instructions on how to install Elasticsearch, Logstash, Kibana, please refer to other article in the website How to get Reliable Log Analytics through ELK?
Step 5- Monitoring through Kibana:
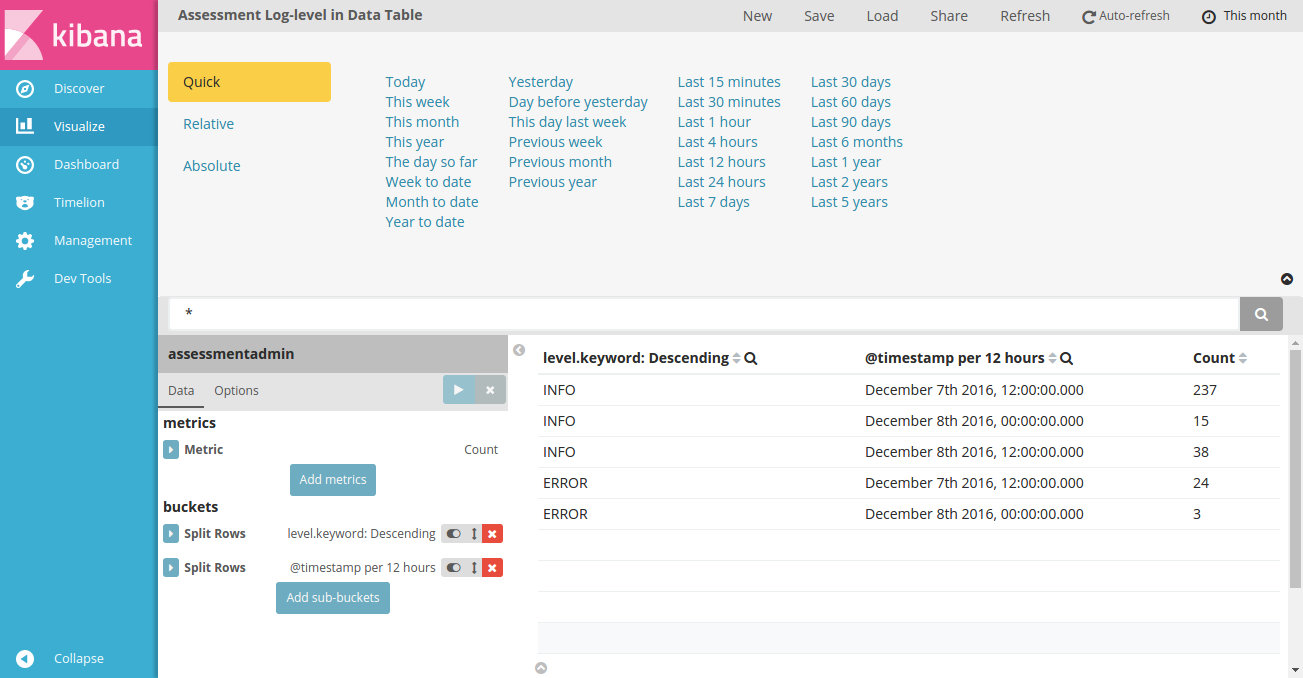
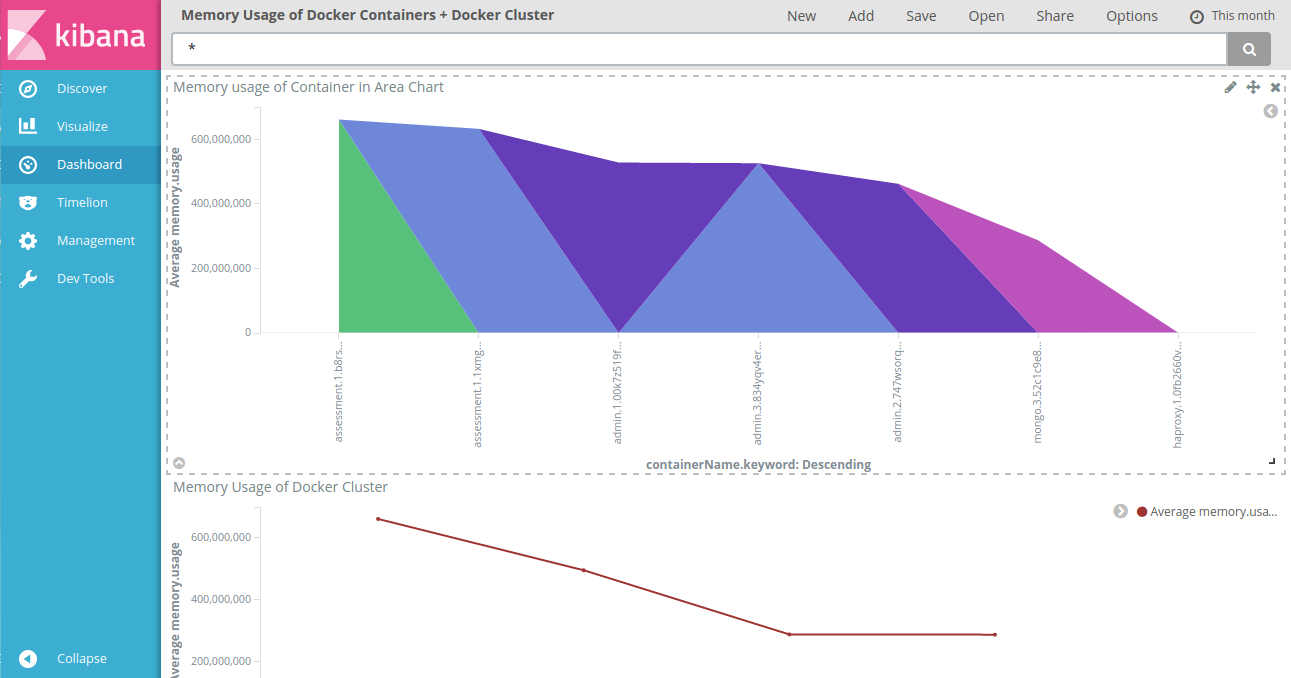
ELK stack helps to monitor application logs and Docker container by collecting data from shippers (filebeat and dockbeat) and create index depends on the logstash configuration. Visualization and Dashboards can be configured and populated by using the log data in Kibana.- Below Screen representation shows
- Application Logs, logs count
- Memory utilization of containers, Clusters.
Conclusion:-
As Docker adoption is accelerating day by day across various clouds and variety of application stack, so the demand also accelerates for monitoring the application logs and infrastructure logs to get more insights of their businesses.
Introduction:
Dockerize may sound like a fancy term at first- but it is not anything to be intimidated by. In simple terms, Dockerize is utility that can help in simplify the running apps in Docker containers. This can be achieved by making use of container environment variables and templates.
Docker and the container are already being flaunted as a revolution, because managing applications in Docker is far easier than managing the applications in legacy way.
As the industry is heading towards Docker adoption, the real challenges are discovered on how to monitor the infrastructure / applications where Docker containers are running.
In this Blog we will explain How to collate the logs from various Dockerized applications and how to monitor the application logs through ELK (Elasticsearch, Logstash, Kibana) stack along with Filebeat and Dockbeat by using below scenarios.
- Application monitoring :-
Monitoring of Application level logs like Error logs, Info logs, Login Failures, Capturing Geo location, etc.
- Infrastructure monitoring :-
Monitoring of Infrastructure information like Host metrics – such as CPU utilization, Memory utilization, Disk utilization etc.
The following sections of the Blog will provide step-by-step procedure of how the log files can be collated, analyzed and converted into Business useful insights.
Deployment Model
The high level Deployment model is as depicted in the below deployment architecture:
The following points provide high level description of the Deployment model. However, a step by step procedure is provided from the next sections of this Blog.
Launch Two EC2 Instances on AWS cloud
- Install Docker Engine in the first EC2 instance and run the application with Filebeat.
- Install ELK stack in the second EC2 instance for monitoring containers.
- Install Docker Engine in first EC2 instance and create two Docker containers and deploy different java applications along with Filebeat.
- Configure the Filebeat.yml file for collecting logs from application and configure to connect Logstash.
- Configure the Dockbeat.yml file for connecting to Elasticsearch.
- Run the java applications through a web browser.
- In second EC2 instance install ELK Stack, then configure the elasticsearch.yml and kibana.yml file for communicate eachother.
- Write a required logstash.conf file for getting required information related to our containers.
- Finally monitor the applications by using Kibana
Docker Setup Introduction
Deploying and running any web application like Java or PHP will have it’s own dependencies / pre-requisites like run-time environment, the compatible jar files etc.
On a day to day basis we come across many situations where the application is running properly on the Dev / Test environment and the same application is deployed / ported to a different environment like Staging / Production, the application fails to deploy successfully. In most of the cases, the reason would be either version mismatch, OS compatibility, required deployment files are missing and so on and so forth.
To overcome this kind of situation Docker engine offers a containerization platform to eliminate the above mentioned hurdles and to have a seamless portability and application deployment. Docker supports packaging of application along with Operating System, runtime environment, application related software into standardized containers that include everything that are needed to run the application.
Step 1 – Docker Setup & Configuration:
Pre-requisite is that you should be familiar with AWS cloud and should have an account with AWS (Amazon Web Services) account
-
- Login into AWS (Amazon Web Services) Account :- https://signin.AWS.amazon.com/
- Create Two Ubuntu EC2 instances, and set required firewall rules to control the traffic of instance.
- Connect instance using Public DNS. It is better to set Admin privileges by using “sudo su” by permanently
$ sudo su
-
- Install docker engine on first EC2 instance
$ wget -qO- https://get.docker.com/ | sh
Let’s make sure that everything is ok by issuing the following command:
$ docker version
Deploying Application on Container
Get a plain tomcat Docker image from Docker hub by Creating a Docker file (name must be dockerfile) and edit the dockerfile with the mentioned command.
$ vi dockerfile
Add the below mentioned line to the docker file
-
- Build the image and tag as “tomcat:latest” or any name.
$ docker build -t tomcat:latest .
-
- Build and run the docker container from the docker image “tomcat:latest”
syntax:-
$ docker run -d -p Host_port:Container_port –name userdefined_container_name base_image_name
Example:-
-
- Access the tomcat from browser “Instance_public_ip:port”
Example:-
-
- Copy the web application from the local system to AWS EC2 Instance, in case f application is available in local system. Open new CLI and type following command.
Syntax:-
$ sudo scp -i location-of-downloaded.pem-file location-of-war-file location-of-AWS-instance:~/.
Example:-
-
- Move / copy the application file to Docker container.
Example:-
-
- Use the following command to access the Docker Container for make any configuration changes.
syntax:-
$ docker exec -it tomcat-container-ID /bin/bash
Example:-
Docker Hub Registration:-
Docker Hub is a Repository to store Docker images. Docker Hub provides an option to store Docker images as private and public.
- Create Docker account with valid credentials
- Login to Docker hub https://hub.docker.com/login/
- Create new repository and push the own docker image to the repository from EC2 instance.
Step 2 – Filebeat Installation & Configuration:
Filebeat is a log data collector and shipper. For monitoring containerized application install Filebeat on Docker container.
Open https://www.elastic.co/products/beats/filebeat find the latest filebeat and choose .deb file Right click on it choose “copy link address”, and paste it on terminal
$ wget https://artifacts.elastic.co/downloads/beats/filebeat/filebeat-5.1.1-amd64.deb
-
- Install using the following command
$ sudo dpkg -i filebeat-5.1.1-amd64.deb
-
- Edit the filebeat.yml and do some configuration modifications which is required
$ vi /etc/filebeat/filebeat.yml
-
- To start Filebeat automatically when container starts add “service filebeat start” command in tomcat “catalina.sh”
$ vi bin/catalina.sh
-
- Exit from the Docker Container and commit the changes and build new image
Syntax:-
$ docker commit Tomcat-container-ID DockerID_Namespace/Repository_name:Tag
Example:-
-
- For pushing the Docker image to Docker Hub repository. Login to Docker Account with secured credentials by following command.
$ docker login
-
- Push the updated docker image to docker hub
Syntax:-
$ docker push New-Docker-Image:Tag
Example:-
-
- Now access the application through browser
Example:-
http://10.0.0.9:8080/application_name/
Step 3 – Dockbeat Installation & Configuration:
Dockbeat is used for monitoring Docker daemon. It is a lightweight agent that needs to be installed on EC2 instance where the Docker engine installed. Periodically it reads Docker container statistics and indexes them in Elasticsearch.
-
- Download Dockbeat from git hub and paste it on terminal and unzip that.
$ wget https://github.com/Ingensi/dockbeat/archive/v1.0.0.tar.gz
$ tar -xvzf v1.0.0.tar.gz
-
- Download executable file from following link using terminal
$ wget https://github.com/Ingensi/dockbeat/releases/download/v1.0.0/dockbeat-v1.0.0-x86_64
-
- Give execution permissions to above downloaded file.
$ chmod +x dockbeat-v1.0.0-x86_64
-
- Edit dockbeat.yml and configure elasticsearch destination ip address and port number.
$ vi dockbeat-1.0.0/dockbeat.yml
-
- Run the dockbeat
$ ./dockbeat-v1.0.0-x86_64 -c dockbeat-1.0.0/dockbeat.yml -v -e
-
- Troubleshooting:
Provide permission to following file, if exception occurs in docker.sock.
$ chmod 777 /var/run/docker.sock
Step 4 – ELK Installation & Configuration:
For detailed instructions on how to install Elasticsearch, Logstash, Kibana, please refer to other article in the website How to get Reliable Log Analytics through ELK?
Step 5- Monitoring through Kibana:
ELK stack helps to monitor application logs and Docker container by collecting data from shippers (filebeat and dockbeat) and create index depends on the logstash configuration. Visualization and Dashboards can be configured and populated by using the log data in Kibana.
- Below Screen representation shows
- Application Logs, logs count
- Memory utilization of containers, Clusters.
Conclusion:-
As Docker adoption is accelerating day by day across various clouds and variety of application stack, so the demand also accelerates for monitoring the application logs and infrastructure logs to get more insights of their businesses.


